Checking notifications on the new notifications screen
You receive notifications when changes are made in Kintone apps, spaces, and so on.
Notifications can be viewed for 70 days. You will not be able to view them after 70 days from the date they are received.
How to try the new notification screen
-
A Kintone administrator checks that the "Try new 'Notifications' screen" option is not disabled on the Update options screen in Kintone administration.
-
A user clicks the Notifications icon (the bell-shaped icon) at the top of Kintone, and then clicks Try new notifications screen at the top of the classic Notifications screen.
 If you want to restore the classic notifications screen, click Use original notifications screen on the new notifications screen.
Overview of the "Notifications" screen
This section describes an overview of the Notifications screen.
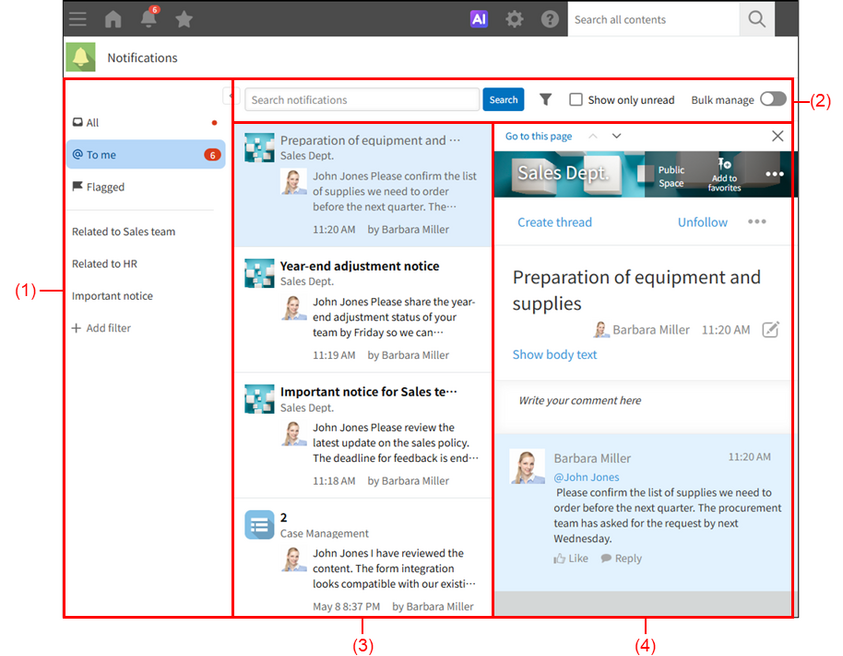
(1) Filtering notifications
You can filter notifications.
The following items are displayed in the notification filtering pane:
- All:
If there are new notifications, a notification badge appears on the right side of the item. When you click this item, all notifications are displayed in the notification list. - To me:
If there are any unread notifications for you, the number of such notifications appears on the right side of the item. When you click this item, notifications for you are displayed in the notification list. - Flagged:
The number of items added to the "Flagged" list appears on the right side of the item. When you click this item, the "Flagged" list is displayed in the notification list. The "Flagged" list shows notifications that have been flagged. - Notification filter set by you (optional)
- Add filter:
For details on how to add your own notification filter, refer to the following section:
Configuring notification filters
(2) Actions on filtered notifications
After narrowing down the notifications list, you can further refine the list by searching by keyword or filtering to show only unread notifications.
The following items are displayed in the action area for the filtered notifications:
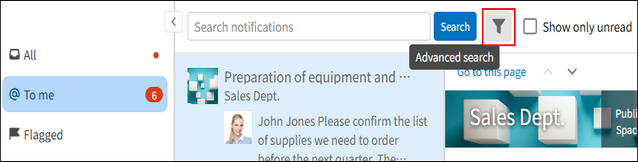
- Search notifications: You can enter keywords to search for notifications.
- The Advanced search icon (the filter-shaped icon): You can search for notifications by specifying keywords, a date range, and a sender. For detailed steps, refer to the following section:
Searching for notifications - Show only unread: Select this option to display only unread notifications.
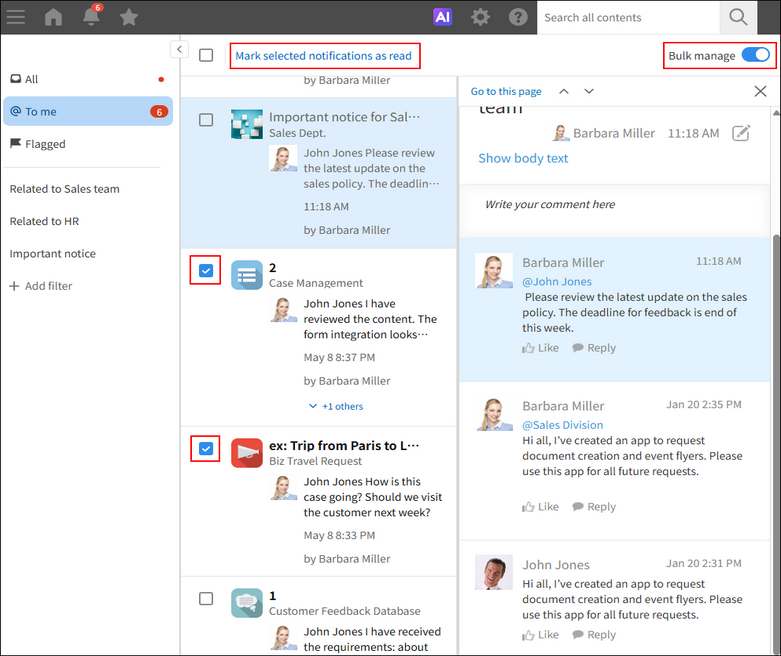
- Bulk manage:
- When Bulk manage is enabled, an option to mark multiple notifications as read at once appears. For detailed steps, refer to the following section:
Marking notifications as read in bulk - When Bulk manage is disabled, icons appear for marking notifications as read individually and adding a Flag.
- When Bulk manage is enabled, an option to mark multiple notifications as read at once appears. For detailed steps, refer to the following section:

(3) The notification list
Notifications are displayed in a list.
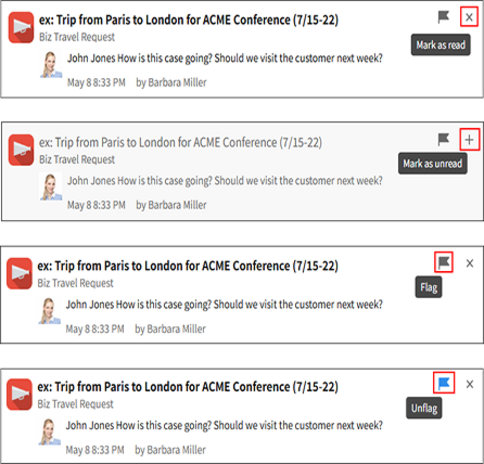
When
Bulk manage is disabled, you can perform the following actions in the notification list:
- Mark as read: You can mark notifications as read.
- Mark as unread: You can mark a read notification as unread.
- Flag: You can add a notification to your flagged list. Notifications with a Flag can be viewed even after 70 days have passed since they were sent, until you remove the flag.
- Unflag: You can remove notifications from your flagged list.
(4) Notification details
When you click a notification in the notification list or on Portal, the notification details are displayed.
The following actions can be performed in the notification details pane:
- Go to this page: The screen where the notification originated is displayed.
- Previous: The details for the previous notification are displayed.
- Next: The details for the next notification are displayed.
- Close: Closes the notification details pane.
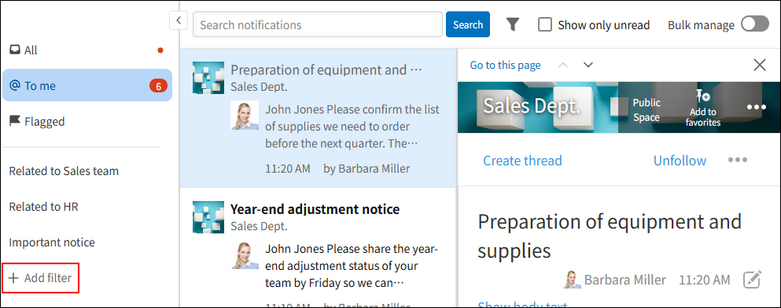
Configuring notification filters
You can create your own notification filters in addition to the pre-defined filters: "All", "To me", and "Flagged".
-
Click Add filter in the notification filtering pane on the Notifications screen.
-
In the Notification filter settings dialog, enter a name in Name to help you identify what the filter is for.
You can enter up to 100 characters in Name. -
In Notification type, select All or To me.
-
In Locations, specify which locations you want to include or exclude notifications from.
You can select from the following options:- All
- Includes any of
- Does not include
-
If you select Includes any of or Does not include in Step 4, specify the locations.
You can specify the following locations, and you can select multiple locations.- Apps
- Spaces
- People
- Messages
-
In Sent from, specify which senders’ notifications you want to include.
You can specify multiple senders. However, you cannot select deleted users or users whose status is Inactive.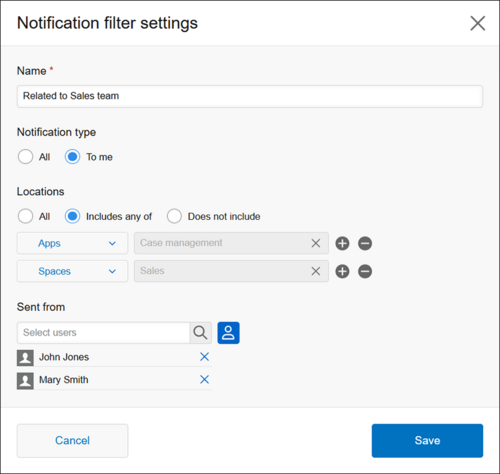
-
Check the settings and click Save.
Changing or deleting notification filter settings
In the notification filtering pane, when you place the mouse cursor over a filter condition you have set, action icons appear.
To change the filter settings, click the displayed Edit icon.
To delete the filter settings, click the displayed Delete icon.

Searching for notifications
You can search for notifications by entering keywords or by specifying detailed search conditions.
-
Enter a keyword in the search box at the top of the notification list, and then click Search.
-
To specify more detailed search conditions, click the Advanced search icon (the filter-shaped icon) next to the Search button.
-
In the Advanced search dialog, enter the search conditions you need and click Search.
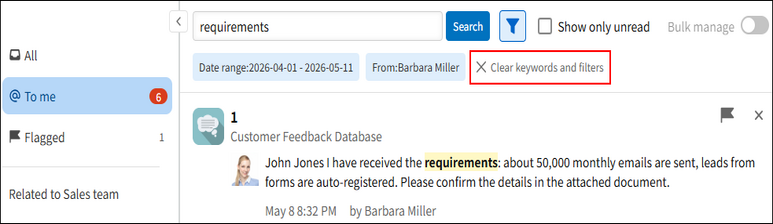
The following search conditions can be specified:- Search keywords: Enter keywords included in the notification title or body text.
- Date range: Specify the period during which notifications were received. Search results are displayed according to the user's time zone.
- From: You can specify up to 100 users.
-
Check the notification search results.
- The date range and sender that you specified as search conditions are displayed above the search results.
- When you click Clear keywords and filters, the conditions configured in the Advanced search dialog are cleared.
- The notification search results are displayed without being grouped.
- When you click Search more at the bottom of the search results list, additional search results appear.
Searchable data in notification search
The following items can be searched in notification search:
- Notification title
- Notification body text: Only the first 1,000 characters are searchable.
- Notification sender
Keywords for notification search
Notes on keywords for notification search are as follows:
- You can enter up to 100 characters for keywords.
- Uppercase and lowercase letters are not distinguished.
- You can enter multiple keywords separated by spaces.
- You can specify up to 10 keywords separated by spaces.
- Data containing all of the specified keywords will be displayed in the search results.
Marking notifications as read in bulk
When Bulk manage is enabled, an option to mark multiple notifications as read at once appears.
-
On the Notifications screen, enable Bulk manage.
-
Select the checkboxes of the notifications you want to mark as read in bulk.
-
Click Mark selected notifications as read.
Grouped notifications
On the Notifications screen, related actions are displayed in groups such as "+N others".
Clicking "+N others" expands the grouped notifications.
This section explains, for each function, which actions are grouped and in what units.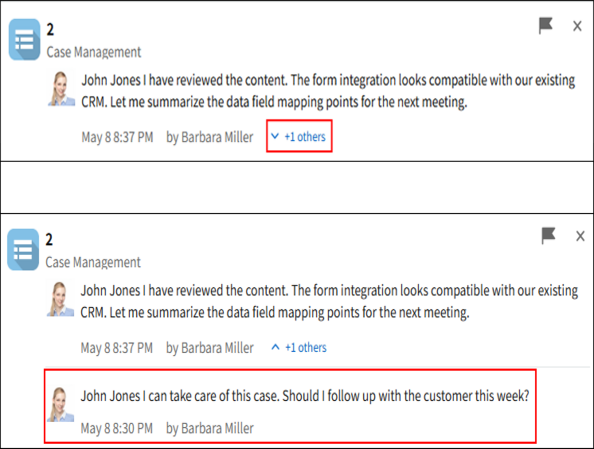
App notifications grouped together
Actions on the same record
The following actions performed on the same record are grouped by record:
- Add a record
- Edit a record
- Change statuses
- Posting comments
Actions related to bulk actions and exporting
The following actions are grouped by app and by action type.
- Import records
- Export records
- Delete records in bulk
- Notifications of periodic reports
- Export graph or pivot table data
Space notifications grouped together
The following actions performed on the space itself are grouped by Space:
- Add Spaces
- Edit the body text of the space's "Announcement" section
- Change app settings
- Change members of a Guest space
Thread notifications grouped together
Actions on threads
The following actions performed on the thread itself are grouped by Thread:
- Add Threads
- Edit thread body text
Actions related to posting in a thread
The following actions are grouped by post:
- Post comments
- Reply to a post
- Like posts and replies
People notifications grouped together
The following actions in People are grouped by post:
- Post on People
- Reply to a post
- Like posts and replies
Message notifications grouped together
The following actions in Message are grouped by recipient:
- Post in Message
- Like posts